This chapter provides an overview of how the VT102 video terminal operates. The text describes all controls, indicators, and general operating procedures. Detailed operating information depends on the computer and its application software.
The terminal operates either on-line, off-line, or in SET-UP. You select on-line and off-line in SET-UP. Chapter 3 describes SET-UP and provides information about selecting on-line and off-line.
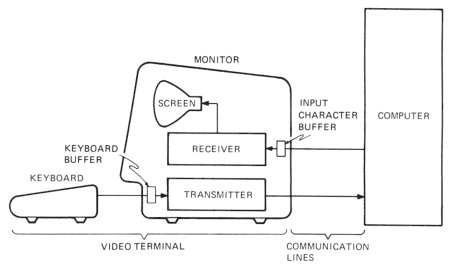
When the ON LINE indicator is on, the terminal can communicate with the computer. When on-line, the terminal serves as both an input and output device of the computer. Figure 1-1 shows a general block diagram of the terminal while on-line.

As an input device, the terminal places keyboard-generated characters in a keyboard character buffer. The characters are then taken from the buffer and transmitted to the computer.
As an output device, the terminal places received characters in the input character buffer for processing. When processing, the terminal removes the received characters from the buffer and either displays or prints them.
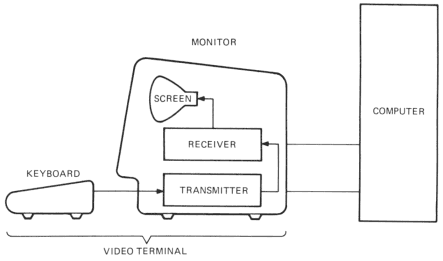
When the OFF LINE indicator is on, the terminal cannot communicate with the computer. Characters typed on the keyboard appear on the screen. Figure 1-2 shows a general block diagram of the terminal while off-line.

An optional serial printer connects to the terminal’s printer interface. Therefore, you can produce printed copy without a separate communication line and interface to the computer. The printer can print when the terminal is on- or off-line.
The terminal has five groups of controls and indicators: monitor controls, communication switches, keyboard controls, visual indicators, and audible indicators.
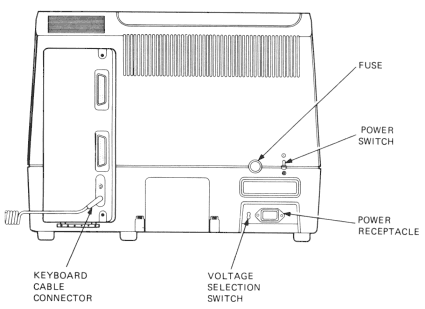
The terminal has two controls on the monitor backpanel, the voltage selection switch and the power switch (Figure 1-3). The following paragraphs describe these monitor controls.

This switch allows the terminal to operate with available ac input voltage range. If you change the switch position, you must also change the fuse. The switch position and fuse are selected when the terminal is installed. See Chapter 7 for more information about installing the terminal.
CAUTION: You may damage the terminal if you set the voltage selection switch to the wrong position and use the wrong fuse.
This switch controls ac power to the terminal. When ac power is on, either the ON LINE or OFF LINE indicator is on. See Keyboard Indicators in this chapter for more information.
Turn the terminal on (power up) by using the following procedure.
NOTE: The on or off state of other indicators depends on the communication signals received and terminal features selected.
If the test finds an error, the terminal provides one of the following indications.
See Chapter 9 if the terminal does not power up correctly.
The terminal has two types of internal switches, communication switches and 20 mA current loop option switches. The following paragraphs describe these switches.
These ten switches select the communication lines used by the modem connector. The switches are set during installation. See Chapter 7 for the selection procedure.
The 20 mA current loop option (VT1XX-CA) has two switches that select active or normal (passive) operation for the transmitter and receiver. See Chapter 8 for more information about the 20 mA current loop option.
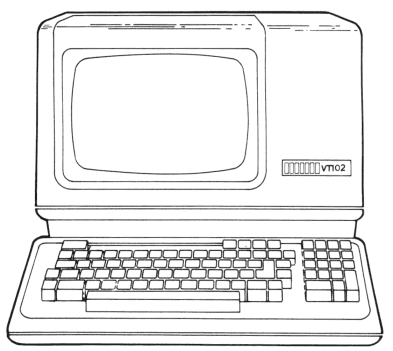
The terminal keyboard has a main keyboard and numeric keypad (Figure 1-4). The main keyboard looks and operates like a standard typewriter. The numeric keypad allows rapid entry of numeric data or function characters (used with some application software). The keys are divided into four groups: standard keys, function keys, printing keys, and SET-UP keys.

Figure 1-5 identifies the standard typewriter and calculator keys. The computer can select the numeric keypad to generate the same characters as the main keyboard. The minus, comma, period, and numeric keys on the keypad operate like the corresponding unshifted keys on the keyboard.
SHIFT and CAPS LOCK modify standard key characters. They do not modify numeric keypad characters. The following paragraphs describe SHIFT and CAPS LOCK. Chapter 4 describes all the characters generated by the standard keys.
SHIFT
When you hold down SHIFT, the standard keys on the main keyboard generate uppercase characters. You can also use SHIFT with the function, printing, and SET-UP keys. See the following paragraphs in this chapter for more information.
CAPS LOCK
This is a two-position locking key. If you lock down CAPS LOCK, the alphabetic keys generate uppercase characters. If you release CAPS LOCK, the alphabetic keys generate lowercase characters. CAPS LOCK does not affect the function and numeric keypad keys.
NOTE: CAPS LOCK does not affect the numeric and special symbol keys. Therefore, CAPS LOCK does not operate like the SHIFT LOCK of a typewriter.
Figure 1-6 identifies the function keys. The computer can also select the numeric keypad to generate function characters. The application software or communication system define the use of function keys. Chapter 4 describes all the characters generated by the function keys. The following paragraphs provide a general description of each function key.
NO SCROLL
This key controls scrolling on the screen. Scrolling is the upward or downward movement of existing lines on the screen to allow new lines to appear. When you first press this key, scrolling stops and new characters cannot appear. When pressed again, scrolling continues and new characters can appear.
NOTE: NO SCROLL operates only in full-duplex communication with the auto XON/XOFF SET-UP feature on. This key does not operate with the auto XON/XOFF feature off or with half-duplex communication.
BREAK/HERE IS
This key generates a break when the break enable SET-UP feature is on. See Chapter 3 for more information about SET-UP features and Chapter 6 for more information about break.
When you hold down SHIFT, BREAK generates a long break disconnect. With some modems, a long break disconnect causes a communication (phone) line disconnect. See Break in Chapter 6 for more information about long break disconnects.
When you hold down CTRL, HERE IS transmits the answerback message. The answerback message identifies the terminal to the computer. You enter the answerback message in SET-UP. See Chapter 3 for more information about the answerback SET-UP feature.
Cursor Control Keys
These keys are defined by the application software. However, they usually generate cursor control commands. The cursor is a screen indicator showing the line and column where the next character will appear.
ESC
This key generates the escape (ESC) control character, defined by the application software.
TAB
This key generates the tab (TAB) control character, defined by the application software.
CTRL
When you hold down CTRL, pressing another key may generate a control character defined by the application software. Chapter 4 describes the control character.
You can also use CTRL with the HERE IS and printing keys. See the description of these keys in this chapter for more information.
BACK SPACE
This key generates the back space (BS) control character, defined by the application software.
DELETE
This key generates the delete (DEL) control character, defined by the application software.
RETURN
This key generates either a carriage return, or carriage return and linefeed. The linefeed/new line SET-UP feature selects the characters generated. See Chapter 3 for more information about this feature.
When using half-duplex coded control (HDX B), RETURN may also automatically generate a line turnaround character. Setting the auto turnaround SET-UP feature selects automatic generation. Setting the turnaround/disconnect character SET-UP feature selects the turnaround character. See Chapter 3 for more information about these features.
LINE FEED
This key generates the linefeed (LF) control character, defined by the application software.
Figure 1-7 identifies the keys that control printing. The optional serial printer can print when the terminal is on- or off-line. The following paragraph describes the (PRINT) key. See Chapter 2 for more information about printing operations.
(PRINT)/ENTER
This key works with CTRL and SHIFT to control printing. When you hold down CTRL, (PRINT) turns the auto print (line-at-a-time printing) operation on and off. When you hold down SHIFT, (PRINT) causes a print screen operation.
Figure 1-8 identifies the keys used in SET-UP. SET-UP lets you select terminal features from the keyboard. SET-UP is divided into SET-UP A and SET-UP B displays. Both displays show a summary of feature selections. Chapter 3 provides both SET-UP feature descriptions and step-by-step feature selection procedures. Read Chapter 3 before using the SET-UP keys. The following paragraphs describe these keys.
SET-UP
This key places the terminal in SET-UP. In SET-UP, you can change the terminal SET-UP features.
SET/CLEAR TAB
In SET-UP A, this key sets or clears individual horizontal tab stops. SET/CLEAR TAB does not operate in SET-UP B.
CLEAR ALL TABS
In SET-UP A, this key clears all horizontal tab stops, CLEAR ALL TABS does not operate in SET-UP B.
ON/OFF LINE
In any SET-UP display, this key switches the terminal between on-line and off-line. While on-line, the terminal can communicate with the computer. While off-line, the terminal cannot communicate with the computer; keyboard entries appear on the screen. The optional serial printer can print when the terminal is on- or off-line.
SETUP A/B
In any SET-UP display, this key switches the terminal between SET-UP A and SET-UP B.
TOGGLE 1/0
In SET-UP B, this key changes the feature selected by the cursor. TOGGLE 1/0 does not operate in SET-UP A.
TRANSMIT SPEED
In SET-UP B, this key selects the transmit speed (baud rate) for either the modem or printer interface. TRANSMIT SPEED does not operate in SET-UP A.
RECEIVE SPEED
In SET-UP B, this key selects the receive speed (baud rate) for either the modem or printer interface. RECEIVE SPEED does not operate in SET-UP A.
80/132 COLUMNS
In SET-UP A, this key selects the display line size (80 or 132 columns per line). 80/132 COLUMNS does not operate in SET-UP B.
RESET
In any SET-UP display, this key starts the reset sequence. Pressing RESET is the same as turning the power switch off and on.
Screen Brightness Keys
In any SET-UP display, ↑ increases and ↓ decreases the screen brightness.
Modem/Printer Select Keys
In any SET-UP display, ← and → move the cursor left and right. In SET-UP B, the arrow keys and SHIFT select either the modem or printer interface features. When you hold down SHIFT, ← selects modem features and → selects printer features.
Answerback
In SET-UP B, SHIFT and A let you create the answerback message. Hold down SHIFT and press A; then type the answerback message. You can use any keyboard key. The terminal stores this identifying message for transmission to the computer.
Turnaround/Disconnect
In SET-UP B, SHIFT and C select the turnaround/disconnect characters. Hold down SHIFT and press C to select the turnaround character. This character works in half-duplex communication with coded control turnaround (HDX B). The disconnect character indicates the end of communication. You must select the disconnect character enable SET-UP feature to use the disconnect character.
Default
In any SET-UP display, SHIFT and D select the default SET-UP feature settings. Hold down SHIFT and press D to select the default SET-UP feature setting. Each SET-UP feature has a default feature setting. Chapter 3 lists the actual default feature settings.
Modem Control
In SET-UP B, SHIFT and M select the type of communication used. Hold down SHIFT and press M to select one of five types of communication. There are three types of full-duplex and two types of half-duplex communication.
Data/Parity Bits
In SET-UP B, SHIFT and P select the data/parity bits feature for either the modem or printer interface. Hold down SHIFT and press P to change the number of data bits per character and type of parity selected.
Recall
In any SET-UP display, SHIFT and R perform a SET-UP feature recall. Hold down SHIFT and press R to recall the SET-UP features stored in user memory.
Store
In any SET-UP display, SHIFT and S perform a SET-UP feature store. Hold down SHIFT and press S to store the SET-UP features in operating memory into user memory.
Tab Default
In SET-UP A, SHIFT and T select a tab default. Hold down SHIFT and press T to select a tab default. This clears all tab stops and sets a tab stop every eighth character position.
The following paragraphs describe the function of each indicator shown in Figure 1-9.
ON LINE
This indicator is on when the terminal is on-line and can communicate with the computer. Either ON LINE or OFF LINE is on when power is on.
NOTE: Depending on the type of communication selected, the terminal may not communicate with the computer until a communication line connection exists. See Chapter 6 for more information about communication types.
OFF LINE
This indicator is on when the terminal is off-line and cannot communicate with the computer. When off-line, the terminal displays keyboard characters on the screen. Either ON LINE or OFF LINE is on when the power is on.
KBD LOCKED
This indicator is on during a keyboard locked condition. This means the keyboard character buffer is full and cannot accept more keyboard characters. The keyboard character buffer holds keyboard characters until the terminal transmits them to the computer (Figure 1-1). If KBD LOCKED is on, keyboard characters are lost. If the keyclick SET-UP feature is on, keys will not generate keyclicks.
NOTE: The terminal can receive characters from the computer during the keyboard locked condition.
There are several causes for the keyboard locked condition (Table 1-1). Each cause has a method to clear the keyboard locked condition. When the condition clears, the terminal can transmit characters to the computer and the KBD LOCKED indicator goes off. If the keyclick SET-UP feature is on, keys will generate keyclicks.
| Cause | Method of Clearing |
|---|---|
| Terminal not connected to computer. Communication line signals are not correct for communication. | Cleared when a connection exists between computer and terminal. Check CTS and DSR indicators to determine if a connection exists. |
| Half-duplex communication is selected (by modem control SET-UP feature) and terminal is receiving characters. Terminal cannot transmit characters when receiving characters in half-duplex. | Cleared when line turns around and terminal can transmit characters. |
| Characters are typed into terminal faster than they can be transmitted. | Cleared when terminal transmits characters in keyboard character buffer to computer. |
| A print operation selected while offline. | Cleared when print operation ends. |
| Computer turns off keyboard. | Computer turns on keyboard. |
|
NOTE: Entering and exiting SET-UP with KBD LOCKED on erases the keyboard character buffer and cancels printing or print operation requests. |
|
CTS
This indicator shows the on and off condition of the clear to send (CTS) or secondary clear to send (SCTS) modem connector signals. The internal communication switches select the connector signal used. See Chapter 6 for more information about the communication signals and internal communication switches.
NOTE: If the 20 mA current loop option (VT1XX-CA) is installed, the CTS signal is not used.
DSR
This indicator shows the on and off state of the data set ready (DSR) modem connector signal. This signal is on when the local modem (connected to the terminal) is ready to communicate. If the signal is off, the modem cannot communicate.
NOTE: If the 20 mA current loop option (VT1XX-CA) is installed, the DSR signal is not used.
INSERT
This indicator shows when the terminal is in insert or replace mode. The computer selects these modes. In insert mode, INSERT is on. The terminal inserts new characters at the cursor position. Characters displayed to the right of the cursor move to the right. Characters moved past the right margin are lost.
In replace mode, INSERT is off. The terminal writes new characters over the current display characters at the cursor position.
L1
This indicator is turned on and off by the computer. Therefore, the application software defines the meaning of L1.
There are three audible indicators: a keyclick, a bell tone, and a series of bell tones. The following paragraphs describe these indicators.
A keyclick sounds when you press a key, with the following exceptions.
A bell tone sounds in each of the following cases.
A series of bell tones sounds to indicate a problem in storing or recalling the SET-UP features in user memory. If the terminal has a problem, it automatically uses the default SET-UP feature selections. See Chapter 3 for more information about the SET-UP feature memories.