Chapter 12

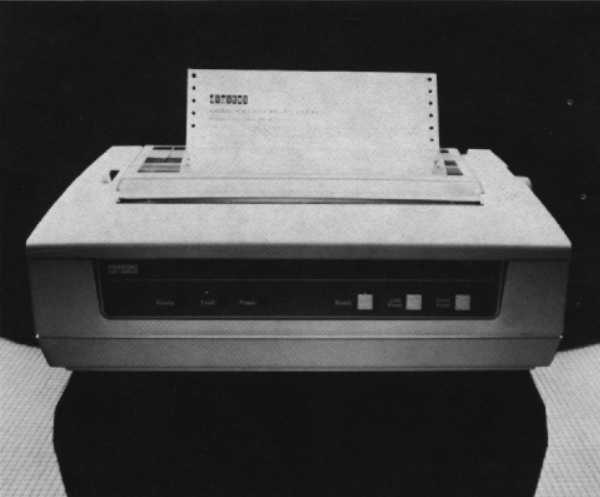
The desktop LA50 printer is compact and lightweight and is designed for use with Digital’s personal computers and video terminals. A serial printer using dot-matrix technology, the LA50 Personal Printer can be used for applications that require both text or graphics output, such as drafts of business and technical reports, graphs and bar charts. In addition to draft-quality printing, the LA50 printer also features a memo-quality print mode, which provides higher-quality print output than ordinary draft printing, and a bold print mode for emphasis.
The LA50 Personal Printer is compatible with all Digital’s personal computers – RAINBOW 100, DECMATE II, and the Professional 325 and 350. It is also compatible with Digital’s VT100 series of video terminals and provides a convenient hardcopy of the screen’s content. In addition, the LA50 is also supported on all Digital’s processors running the RT-11 and RSTS/E operating systems.
There are four models of the LA50 Personal Printer.
The LA50 Personal Printer’s main features are:
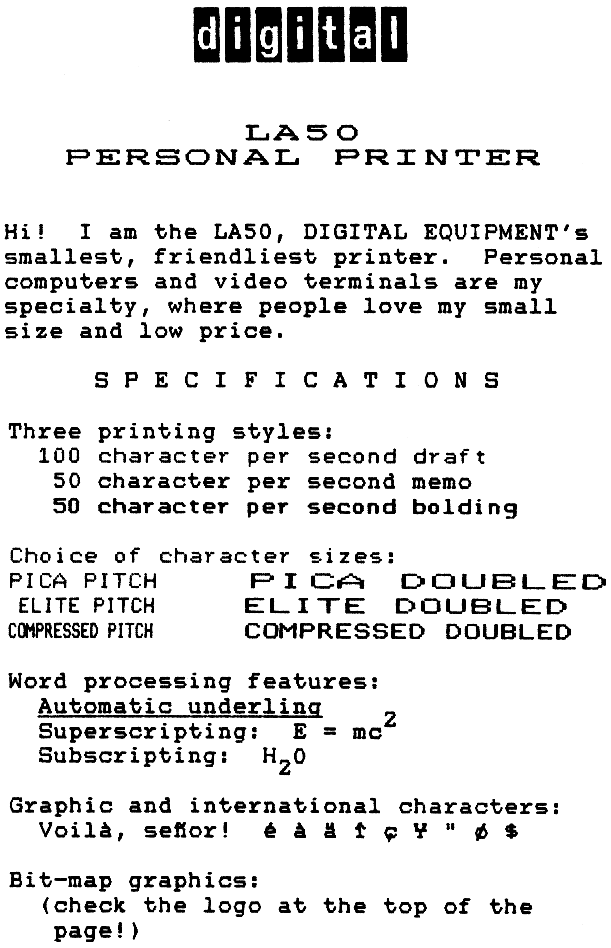
The LA50 Personal Printer offers three program-selectable print modes. A nine-wire printhead enables the LA50 to print below-the-line descenders, such as the letters “p,” “q,” and “y,” as well as to underline in all text modes. The graphics mode can be used to plot graphs and draw pictures that entail shading and curved lines. In addition to the print modes listed below, the LA50 has a bold print mode in which characters are double-struck for emphasis.
The seven by nine dot-matrix character cell provides fast output at the rate of 100 characters per second. This is suitable for draft and data printing. Printing is accomplished through a bidirectional technique in which the printhead seeks the shortest distance to the next printable character rapidly skipping over blank spaces.
The LA50 prints a denser character using a matrix of 13 by 9 dots and produces clearer, darker, more legible characters suitable for correspondence. Memo mode prints at the rate of 50 characters per second.
In graphics mode, the LA50 Personal Printer prints 72 dots per inch vertically, and 144 or 180 dots per inch horizontally, depending on the host aspect ratio.
A predetermined escape sequence from the host enables the LA50 to enter the bit-map graphics mode. Microcode control of individual printhead wires makes every dot addressable by the host and enables images displayed on a video terminal to be faithfully reproduced. This allows for the printing of an infinite variety of pictures and graphs, including pie and bar charts, logos, signatures, and unique characters.
The LA50 Personal Printer has 14 operator-selectable character sets resident at all times. The 250 printable characters include:
Selectable via software, the LA50 Personal Printer can print double-width and compressed characters. Character size can be changed from 10 to 12 characters per inch (pica to elite). In addition, the compressed print fits 132 columns to display a full spreadsheet on standard 21.6 cm (8.5 inch) wide page. Double-width characters print at 5, 6, and 8.25 characters per inch.
The versatile LA50 Personal Printer can print on single sheets ranging from 7.6 to 22.9 cm (3 to 9 inches) wide. In addition, fanfold paper from 11.4 to 25.4 cm (4.5 to 10 inches) wide can also be used. It prints on three-part forms (one original and two copies) to a maximum thickness of 0.028 cm (0.011 inches).
Not Applicable
The following accessories, supplies, and spares are available for the LA50 Personal Printer. Check with your sales representative or Digital’s Accessories & Supplies Group for the latest information.
| Part Number | Description |
|---|---|
| H9850-HN | Dust Cover |
| LA50X-FB | Acoustic Cover for noise reduction, 120 volt fan |
| LA50X-FF | Wire basket paper catcher, will accept any 21.6 cm × 27.9 cm (8.5 × 11 in) sheet paper |
| LAX12-SL | Printer stand – charcoal colored base with light oak laminated top; 61 cm wide × 53.3 cm deep × 66.1 cm high (24 in × 21 in × 26 in) |
| PCXXF-CJ | Printer stand – grey, high pressured laminated top with light oak trim, charcoal base, laminated top; 61 cm wide × 53.3 cm deep × 66.1 cm high (24 in × 21 in × 26 in) |
| PCXXF-CF | Small lightweight stand which sits on desk and has 7.6 - 12.7 cm (3 - 5 in) opening for paper storage. |
| Part Number | Descripion |
|---|---|
| LA50R-06 | Box of 6 ribbons |
A total of six controls and indicators are found on the front panel of the LA50 Personal Printer.

The green READY light indicates the operating state of the printer. The light is on when the printer is on-line and ready to print or is printing. The light is off when the printer is not ready, off-line, or the FAULT indicator is on.
The red FAULT light blinks when the printer detects an electronic fault. The light stays on when the printer is out of paper.
The green POWER light is on when the power is turned on.
The READY switch controls the operating state of the printer. Pressing the switch alternately puts the printer in the Ready or Not Ready state. Check the READY light to determine if the printer is on-line or off-line.
Pressing the LINE FEED switch advances the paper one line.
Pressing the FORM FEED switch advances the paper one full sheet. Length is set at the factory, but you can change it by using the appropriate escape sequence.
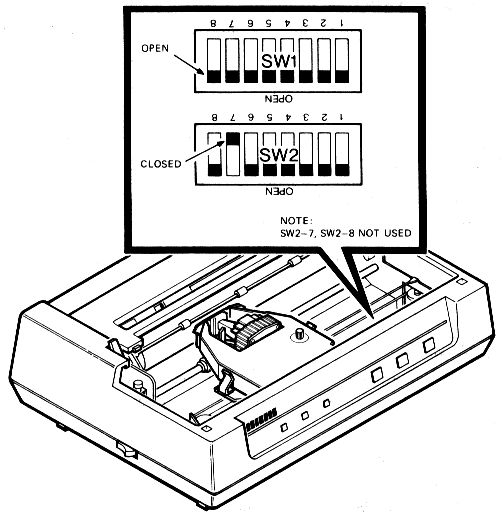
The LA50 Personal Printer configuration switches are set for use with Digital systems in the United States. If you need to change the configuration, the switches required for this operation are located under the printer’s front access cover. Note: Before resetting the switches, check that you have turned the power off.
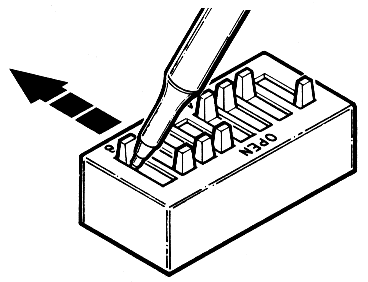
The switch positions can be easily changed by sliding the switch tabs with a ball point pen or equivalent. Note: Never use a lead pencil.
The national character set switches are designated SW1-1 through SW1-4. These switches are initially set to the United States position – all four switches open. To call up a particular national character set, put the switches in the sequence prescribed in the following chart.
| Nation | SW1 Position | |||
|---|---|---|---|---|
| SW1-1 | SW1-2 | SW1-3 | SW1-4 | |
| United States | Open | Open | Open | Open |
| Britain | Closed | Open | Open | Open |
| Finland | Open | Closed | Open | Open |
| France | Closed | Closed | Open | Open |
| French Canada | Open | Open | Closed | Open |
| Germany | Closed | Open | Closed | Open |
| Italy | Open | Closed | Closed | Open |
| Japan | Closed | Closed | Closed | Open |
| Norway/Denmark | Open | Open | Open | Closed |
| Spain | Closed | Open | Open | Closed |
| Sweden | Open | Closed | Open | Closed |
Switch SW1-5 changes the horizontal to vertical dot ratio in graphics mode by changing the number of horizontal dots per inch. This switch is initially set for 144 horizontal dots per inch. If your graphics printing looks distorted, you probably are using a system that works on 180 horizontal dots per inch. In this instance, just change the switch setting. The number of vertical dots is kept constant at 72 dots per inch.
| Ratio | Horizontal Dots per Inch | SW1-5 Position | Application |
|---|---|---|---|
| 2 to 1 | 144 | Open (Factory Setting) |
VT200 Series VT125 Graphics Rainbow 100 Graphics |
| 2.5 to 1 | 180 | Closed | Professional 350 Graphics |
Digital’s systems use the XON/XOFF protocol for communications control. Other systems may require the Ready/Busy protocol. Switch SW1-6 selects the XON/XOFF or Ready/Busy protocol as shown below.
When SW1-6 is open, the XON/XOFF protocol is selected. This is also the factory setting. When the switch is closed, the Ready/Busy protocol will control communications.
If you select the Ready/Busy protocol, you can choose the polarity of the busy or ready signal. When SW1-7 is open, the signal condition is high – Busy and low – Ready. When the switch is closed, the reverse is true.
Switch SW1-8 selects the method of controlling a line of characters that exceed the eight-inch line of print. If set to truncate, the printer is limited to printing the first eight inches of characters and it drops the remaining characters. If set to wrap, the printer prints the remaining characters on the next line.
When switch SW1-8 is open, the line is set to truncate. This is also the factory setting. When closed, switch SW1-8 causes the line to wrap.
The switches SW2-1, SW2-2, and SW2-3 select the speed at which the printer communicates with the host.
| Baud Rate (Bits per Second) |
SW2-1 | SW2-2 | SW2-3 |
|---|---|---|---|
| 4800 (Factory Setting) |
Open | Open | Open |
| 2400 | Open | Closed | Open |
| 1200 | Open | Closed | Closed |
| 600 | Closed | Open | Open |
| 300 | Closed | Open | Closed |
| 200 | Closed | Closed | Open |
| 110 | Closed | Closed | Closed |
Switches SW2-4, SW2-5, and SW2-6 select the data format to enable communication with the computer.
| Data Format | SW2-4 | SW2-5 | SW2-6 |
|---|---|---|---|
| 7 Bits + Odd Parity | Open | Closed | Closed |
| 7 Bits + Even Parity | Closed | Closed | Closed |
| 7 Bits + 8th Bit Mark | Open | Open | Closed |
| 7 Bits + 8th Bit Space | Closed | Open | Closed |
| 8 Bits + Odd Parity | Open | Closed | Open |
| 8 Bits + Even Parity | Closed | Closed | Open |
| 8 Bits, No Parity (Factory Setting) |
Open | Open | Open |
The factory settings for the data format switches is 8-bit, no parity, which corresponds to the convention for Digital’s personal computers.
The LA50 Personal Printer uses escape sequences which were standardized by the American National Standards Institute (ANSI). While some features of the LA50 lack an ANSI-standard escape sequence, Digital has defined additional escape sequences that are within the extensions permitted by the ANSI standard. These escape sequences allow expansion of control functions beyond the current limit of 32 control characters.
Using these additional escape sequences, you can control additional LA50 features. Following the brief description of each escape sequence feature will be the summary of the actual escape sequence required. Additional information on escape sequences can be found in the LA50 Printer Programming Reference Manual.
This allows you to move the paper up or down 1/12 inch.
| Name | Escape Sequence | Description |
|---|---|---|
| Partial Line Down | ESC K |
Moves line down (paper up) 1/12 inch |
| Partial Line Up | ESC L |
Moves line up (paper down) 1/12 inch |
Horizontal-pitch selection allows you to vary the number of characters per inch. You can choose to print 10, 12 or 16.5 single-width characters per inch. If you wish to print double-width characters, you can set the pitch to be 5, 6, or 8.25 characters per inch.
Vertical-pitch selection allows you to vary the number of lines per inch. You can select to use 2, 3, 4, 6, 8 or 12 lines per inch.
| Escape Sequence | Description |
|---|---|
ESC [ 0 w |
Sets horizontal pitch to 10 char/in |
ESC [ 1 w |
Also sets horizontal pitch to 10 char/in |
ESC [ 2 w |
Sets horizontal pitch to 12 char/in |
ESC [ 4 w |
Sets horizontal pitch to 16.5 char/in |
ESC [ 5 w |
Selects double-width printing and sets horizontal pitch to 5 char/in |
ESC [ 6 w |
Selects double-width printing and sets horizontal pitch to 6 char/in |
ESC [ 8 w |
Selects double-width printing and sets horizontal pitch to 8.25 char/in |
ESC [ 0 z |
Sets vertical pitch to 6 l/in |
ESC [ 1 z |
Sets vertical pitch to 6 l/in |
ESC [ 2 z |
Sets vertical pitch to 8 l/in |
ESC [ 3 z |
Sets vertical pitch to 12 l/in |
ESC [ 4 z |
Sets vertical pitch to 2 l/in |
ESC [ 5 z |
Sets vertical pitch to 3 l/in |
ESC [ 6 z |
Sets vertical pitch to 4 l/in |
At power-up, the page length is set to 27.9 cm (11 inches), corresponding to 66 lines with the default vertical spacing.
The page length command allows you to set the number of lines per page. This is accomplished by using a simple equation to calculate the page length, Pn. Just multiply the page length in inches per page by the current vertical pitch in lines per inch. The result gives you Pn, the number of lines per page.
The following chart gives the required Pn values for a small selection of page lengths.
| Page Length (inches) | Selected Vertical Pitch | |||||
|---|---|---|---|---|---|---|
| 2 | 3 | 4 | 6 | 8 | 12 | |
| 11 | 22 | 33 | 44 | 66 | 88 | 132 |
| 14 | 28 | 42 | 56 | 84 | 112 | 168 |
The page length can be set to length from 1/12 inch per page to 53.3 cm (21 inches) per page at the selected vertical pitch. If the desired page length exceeds 53.3 cm (21 inches), then the printer will default to 53.3 cm (21 inches).
The normal print mode of the LA50 Personal Printer is text mode. In text mode, the printer is capable of printing the 94 printable characters of the ASCII character set, the 81 additional characters of the multinational character set, the 63 additional characters of the JIS Katakana character set, the 27 additional characters of the VT100 line drawing character set, and the error character, which is a reverse question mark. These 266 different characters are grouped into 14 character sets. The proper escape sequence allows you to select the character set you want for your work.
The printer is considered to be in seven-bit mode if the number of data bits has been set to seven. In seven-bit mode, all characters are printed from the character set designated GL.
The printer is considered to be in eight-bit mode if the number of data bits has been set to eight. In eight-bit mode all characters are printed from the GL character set if the eighth bit is 0 or from another set named GR if the eighth bit is 1. The advantage of eight-bit mode is that two character sets (one in GL and one in GR) can be resident simultaneously.
Once you have selected to work in either the GL (7-bit) or GR (8-bit) character set mode, your next step is to load one of the four intermediate pointers, G0, G1, G2 or G3. These intermediate pointers, once loaded into the register, allow you access to any of the fourteen available character sets. For example, if you selected to work in GL (7-bit) mode, you can load either G0, G1, G2 or G3 into the terminal according to the escape sequences listed in Table 12-7. This table lists the commands and designates how the pointer select the GL or GR set. For example, the LS2 command causes the GL set to select the character set assigned to G2 and the LSR1 command causes the GR set to select the character set assigned to G1.
| Command | Mnemonic | Escape Sequence | GL Set | GR Set |
|---|---|---|---|---|
| Shift in | SI | CTRL/O | G0 | – |
| Shift out | SO | CTRL/N | G1 | – |
| Single shift 2 | SS2 | ESC N |
G2 | – |
| Single shift 3 | SS3 | ESC O |
G3 | – |
| Locking shift 2 | LS2 | ESC n |
G2 | – |
| Locking shift 3 | LS3 | ESC o |
G3 | – |
| Locking shift 1 right | LS1R | ESC ~ |
– | G1 |
| Locking shift 2 right | LS2R | ESC } |
– | G2 |
| Locking shift 3 right | LS3R | ESC | |
– | G3 |
Once the intermediate pointer is loaded, use the proper escape sequence shown in Table 12-8 to select the character set you need. On the other hand, if you want to work in GR (8-bit) mode, you can load either G1, G2 or G3 as the intermediate pointer. Again, you select the character set of your choice from Table 12-8. The character-set escape sequences that assign the character sets to the pointers are shown in the table below.
| Character Set | G0 | G1 | G2 | G3 |
|---|---|---|---|---|
| ASCII | ESC ( B |
ESC ) B |
ESC * B |
ESC + B |
| Britain | ESC ( A |
ESC ) A |
ESC * A |
ESC + A |
| Finland | ESC ( 5 |
ESC ) 5 |
ESC * 5 |
ESC + 5 |
| Finland | ESC ( C |
ESC ) C |
ESC * C |
ESC + C |
| France | ESC ( R |
ESC ) R |
ESC * R |
ESC + R |
| French Canada | ESC ( 9 |
ESC ) 9 |
ESC * 9 |
ESC + 9 |
| French Canada | ESC ( Q |
ESC ) Q |
ESC * Q |
ESC + Q |
| Germany | ESC ( K |
ESC ) K |
ESC * K |
ESC + K |
| Italy | ESC ( Y |
ESC ) Y |
ESC * Y |
ESC + Y |
| JIS Roman | ESC ( J |
ESC ) J |
ESC * J |
ESC + J |
| JIS Katakana | ESC ( I |
ESC ) I |
ESC * I |
ESC + I |
| Norway/Denmark | ESC ( 6 |
ESC ) 6 |
ESC * 6 |
ESC + 6 |
| Norway/Denmark | ESC ( E |
ESC ) E |
ESC * E |
ESC + E |
| Spain | ESC ( Z |
ESC ) Z |
ESC * Z |
ESC + Z |
| Sweden | ESC ( 7 |
ESC ) 7 |
ESC * 7 |
ESC + 7 |
| Sweden | ESC ( H |
ESC ) H |
ESC * H |
ESC + H |
| Multinational | ESC ( < |
ESC ) < |
ESC * < |
ESC + < |
| VT100 Special Graphics | ESC ( 0 |
ESC ) 0 |
ESC * 0 |
ESC + 0 |
This allows you to select either draft-quality or memo-quality printing.
| Escape Sequence | Description |
|---|---|
ESC [ 0 " z |
Selects normal density printing |
ESC [ 1 " z |
Selects normal density printing |
ESC [ 2 " z |
Selects memo (enhanced) density printing |
Enhanced printing density and bold printing cannot be performed at the same time. If both are specified, enhanced printing takes precedence. Exceptions to this are as follows.
This allows you to select either bold or underlined printing.
The following sequences select bold or underline as specified by the parameters, Pn. All following printable characters are rendered according to these parameters until the next selection.
| Name | Mnemonic | Escape Sequence | Description |
|---|---|---|---|
| Select Graphics Rendition | SGR | ESC [ Pn . . . Pn m |
|
| When Pn equals 0 | Bold printing is turned off, and underline printing is turned off. | ||
| When Pn equals 1 | Bold printing is turned on. | ||
| When Pn equals 4 | Underline printing is turned on. | ||
| When Pn equals 22 | Bold printing is turned off. | ||
| When Pn equals 24 | Underline printing is turned off. |
Bold printing and underline printing cannot be done simultaneously. Enhanced density and bold printing cannot be performed at the same time. If both are specified, enhanced density takes precedence. Exceptions to this are as follows.
Escape sequences allow the printer to automatically send an answer to a request for device attributes sequence, send an answer to a device status request sequence, and send brief and extended status reports.
Status reports may be solicited or unsolicited. Unsolicited reports, if enabled, are sent when any reportable status condition changes state. Unsolicited status reports are initially disabled. A brief report indicates whether or not a malfunction was detected. An extended status report can help pinpoint the malfunction as either a hardware failure (printhead position failure), communication failure (parity or framing error or receipt of erroneous character), input buffer overflow, printer deselection, cover open, or paper out.
| Name | Mnemonic | Escape Sequence | Description |
|---|---|---|---|
| Device Attribute | DA | ESC [ c or ESC [ 0 c |
This is the sequence sent to the printer. |
ESC [ ? 1 7 c |
This is the answer sent by the printer which forms the product identification of the printer. | ||
| Device Status Request | DSR | ESC [ n or ESC [ 0 n |
Either of these sequences sends extended status report. |
ESC [ ? 1 n |
Disables all unsolicited reports. | ||
ESC [ ? 2 n |
Enables unsolicited brief status report and sends extended status report. | ||
ESC [ ? 3 n |
Enables unsolicited extended status reports and sends extended status report. | ||
| Device Status Report (Brief Report) | DSR | ESC [ 0 n |
Indicates no malfunction was detected. |
ESC [ 3 n |
Indicates that a malfunction was detected. | ||
| Device Status Report (Extended Report) | DSR | ESC [ 0 n followed by ESC [ ? 2 0 n |
Indicates no malfunction was detected. |
ESC [ 3 n followed by ESC [ ? Pn ; . . . Pn n |
Indicates that a malfunction was detected. |
Pn may be any combination of the following values.
Communication failure may be parity or framing error or receipt of an erroneous character. Failures designated as events are reset upon sending an extended report and are reportable only when they occur – not when they are reset.
In graphics mode, you can select to print individual dot patterns rather than predefined characters from the character sets.
ESC P q enables the printer to enter graphics mode. In this mode, you can specify
graphics patterns by sending characters in the range of 077 to 176 (octal) to the LA50
printer. Each of these 64 possible characters specifies a unique pattern formed by the
upper six dots of the printhead. The bottom three dots are not used.
The preferred exit from graphics mode to text mode is via the ESC escape sequence or the 220 (octal) control character.
For more details about graphics mode, consult the LA50 Programmer Reference Manual.
The LA50 Personal Printer does not need preventative maintenance, but there are a number of tests you can run to be sure your LA50 is operating correctly. To maintain proper operating temperatures, you should keep the printer away from extreme temperatures, such as direct sunlight, room heaters and air conditioners. Its surfaces and platen can be cleaned with a damp cloth. Do not use cleaners with solvents or excessive water.
To initiate a self-test procedure:
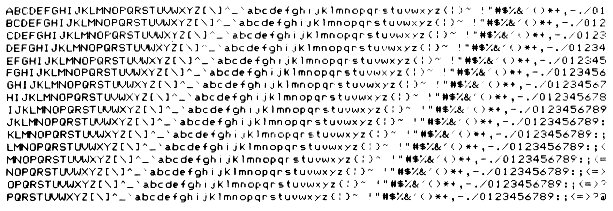
If your printer is not operating, chances are the problem is minor and you can correct it yourself. Listed below are some of the common problems, their probable cause in the first column, and the corrective action that you can take in the second column. Note: Always turn off the printer before you attempt to correct a problem.
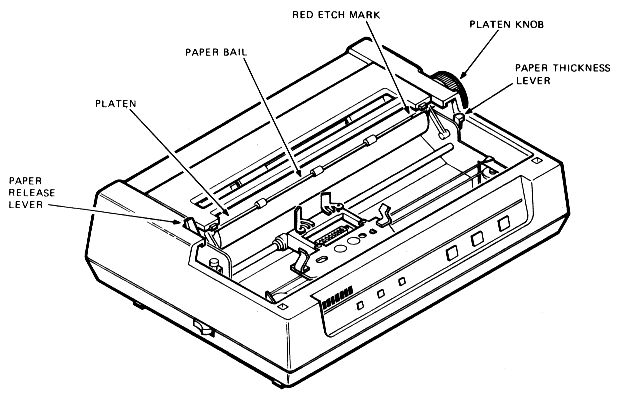
Printer does not start when power is turned on.
No printout. FAULT light is on. Pressing the ready button causes the printer to print one line.
No printout. READY light is out and pressing the READY switch toggles the light, but the printer is still not ready.
Light print.
Carriage moves, but no printout.
Missing dots in print; always in same row.
Paper jams.
Pinfeed paper jams.
The following documents contain more detailed information about the LA50 Personal Printer.
Also of interest are:
If you require information not contained in these documents, contact your local Digital representative.
| Print speed | 100 char/s (draft) |
| 50 char/s (memo) | |
| 50 char/s (bold) | |
| Print technology | Bidirectional, dot matrix |
| Print density | 7 × 9 (draft) |
| 13 × 9 (memo) | |
| Character pitch | |
| Compressed font | 16.5 char/in; 132 char/l |
| Double width | 8.25 char/in; 66 char/l |
| Elite pitch | 12 char/in; 96 char/l |
| Double width | 6 char/in; 48 char/l |
| Pica width | 10 char/in; 80 char/l |
| Double width | 5 char/in; 40 char/l |
| Line spacing | 2, 3, 4, 6, 8, or 12 l/in |
| Graphics | 144 or 180 dots/in, horizontal |
| 72 dots/in, vertical | |
| Line feed speed | 100 ms/l at 6 l/in |
| Buffer capacity | 2047 characters |
| Buffer control | XON/XOFF or restraint signal data synchronization |
| Type | Single sheet or sprocket |
| Dimensions | |
| Single sheets | 7.6 cm to 22.8 cm (3 to 9 in) wide |
| Sprocket | 11.4 cm to 25.4 cm (4.5 to 10 in) wide |
| Sprocket holes | 10.2 cm to 24.1 cm (4 to 9.5 in) on center |
| Thickness | 0.028 cm (0.011 in) maximum |
| Baud rates | 110, 200, 300, 600, 1200, 2400, 4800, switch-selectable |
| Data interface | Serial RS232-C and RS423 EIA standard |
| Parity | 7-bit, odd, even, mark, or space 8-bit, odd, even, or none |
| LA50-RA | 120 Vac, 50 or 60 Hz |
| LA50-RB | 220 Vac, 50 or 60 Hz |
| LA50-RC | 240 Vac, 50 or 60 Hz |
| LA50-RD | 100 Vac, 50 or 60 Hz |
| Power consumption | Less than 180 W |
| Temperature | 10°C to 40°C (50°F to 104°F) |
| Relative humidity | 10% to 90% |
| Width | 40 cm (16 in) |
| Depth | 29.5 cm (11.8 in) |
| Height | 14.2 cm (5.6 in) |
| Weight | 8.5 kg (18.7 lb) |