Chapter 11

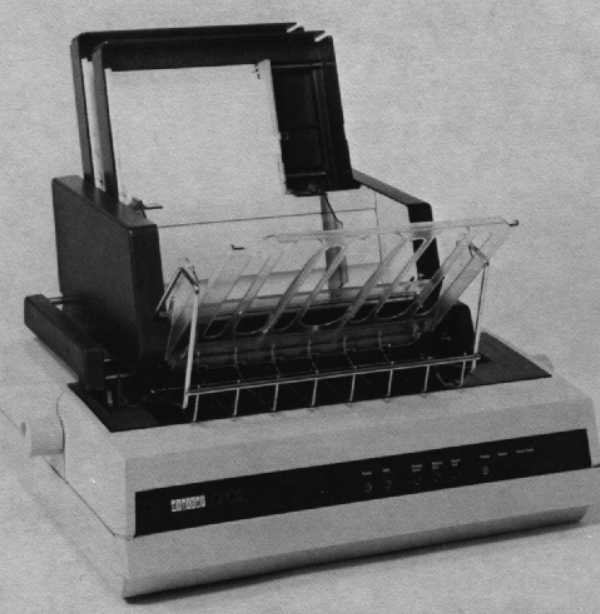
The LQP02 is a desktop, full character impact printer. It uses daisywheel technology to produce printed copy much like that from your office typewriter. This makes it ideal for such word processing applications as business correspondence and formal documents.
While designed for use with all of Digital’s personal computers, workstations, and video terminals, the LQP02 letter-quality printer is also supported on any Digital processor running the RT-11, RSX-11M, RSX-11M-PLUS, RSTS/E and VME operating systems.
The LQP02 can even be used for applications that require graphics output, such as pie and bar charts, and line graphs. This capability is made possible by Digital’s new DaisyAids software package, which can be purchased separately. DaisyAids is specifically designed for the LQP02 when used in conjunction with Digital’s DECmate II and Rainbow 100, running the CP/M™ operating system.
There are two models of the LQP02 letter-quality printer.
The LQP02 letter-quality printer’s main features are:
The LQP02 letter-quality printer offers full character letter-quality printing.
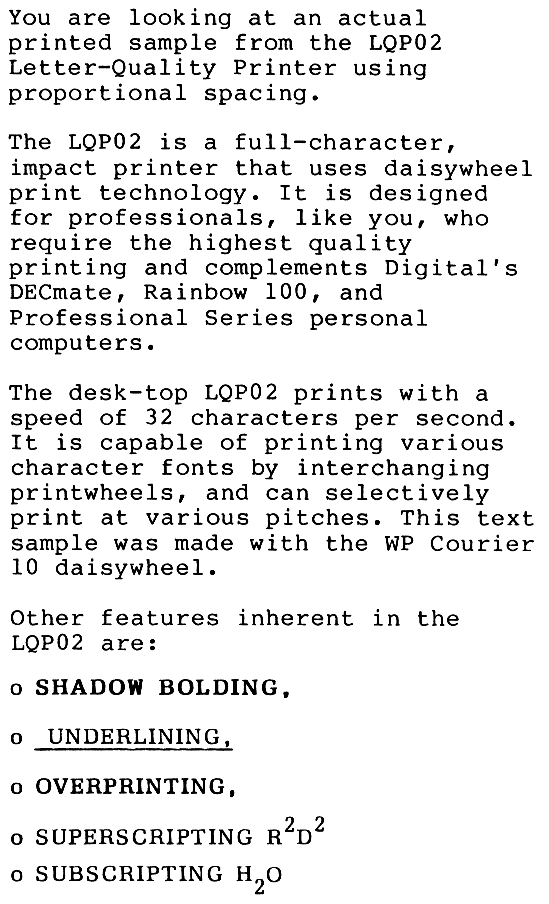
LQP02 technology provides letter-quality output at the rate of 32 characters per second. This is suitable for professional-looking correspondence. Printing is accomplished through a bidirectional technique in which the printwheel seeks the shortest distance to the next printable character, rapidly skipping over blank spaces.

A new feature called “shadow bolding” makes shadow bolded print much more visible than normal bold print. In this technique, characters are struck twice as in normal bolding. But unlike normal bolding, the second strike is slightly offset from the first, resulting in a shadow image.
Changing character sets or type styles is as easy as changing the printwheel. You can select from: UKN Letter Gothic 12, WP Courier 10, WP Pica 10, WP Prestige Elite 12, ANSI OCR-B 10, WPS Boldface Italic PS, Dual Courier 10, European Courier 10, and Greek/Math, as well as others.
With the LQP02, character size can be changed from 10 to 12 characters per inch. When using 10 characters per inch, you can fit 132 columns on legal-sized paper. With 12 characters per inch, 158 columns will fit on legal-sized paper.
The LQP02’s sheet feeder option handles regular office stationery in standard, legal, and European sizes. The adjustable form tractor option handles fanfold paper from 7.6 centimeters to 38.1 centimeters (3 - 15 inches) wide, and prints up to 34.3 centimeters (13.5 inches) across.
| Part Number | Description |
|---|---|
| LQPX2-SF | Dual-tray cutsheet feed; two trays automatically feed pre-cut paper in either portrait or landscape fashion. Front tray accommodates lengths from 26.9 cm to 36.8 cm (10.6 in - 14.5 in), while back tray holds 19.8 cm to 36.8 cm (7.8 in - 14.5 in). Range of widths is between 17.0 cm and 30.5 cm (6.7 in and 12 in) |
| LQPX2-AA | Forms tractor handles fanfold paper between 7.6 cm and 38.1 cm (3 to 15 in) wide |
| LQPX2-SW | Serial interface switch enables better allocation of printing resources. One LQP02 can be shared between two systems in an environment where printing needs are light. Where there is a higher demand for printed documents, two printers can be connected to one system and switched back and forth as needs dictate. |
| LQPX2-FB | Acoustic cover with 120 Vac fan that reduces noise and fits over printer and forms tractor |
| LQPX2-FD | Acoustic cover with 240 Vac fan that reduces noise and fits over printer and forms tractor |
| LQPX2-FJ | Acoustic cover that reduces noise and fits over printer and sheet feeder. |
| DF01-A | Acoustic telephone coupler, 300 b/s with combination EIA (RS232-C) and 20 mA current loop cable |
| DF02-AA | Direct, connect, Bell 103J equivalent, 300 b/s, full duplex, asynchronous modem with EIA RS232-C interface. |
| DF03-AA | Direct, connect, Bell 212A equivalent, 200/1200 b/s, full duplex, synchronous, asynchronous modem with EIA RS232-C interface |
The following accessories, supplies, components, and spares are available for the LQP02 letter-quality printer. Check with your sales representative or Digital’s Installed-Base Group for the latest information.
| Part Number | Description |
|---|---|
| LQP02-KA | 6 high-quality impression multistrike film ribbons. Single loop, sensor stops printer at ribbon’s end before characters are lost. |
| LQP02-KB | 6 continuous-loop nylon ribbons. Use until desired type quality can no longer be obtained. |
| Part Number | Description |
|---|---|
| LQP02-MB | Printwheel, UKN Letter Gothic 12 |
| LQP02-MD | Printwheel, WP Courier 10 |
| LQP02-ME | Printwheel, WP Pica 10 |
| LQP02-MF | Printwheel, WP Prestige Elite 12 |
| LQP02-MH | Printwheel, Bilingual Courier 10 |
| LQP02-MJ | Printwheel, Bilingual Prestige Elite 12 |
| LQP02-MK | Printwheel, Bilingual WP Orator 90% 10 |
| LQP02-ML | Printwheel, ANSI OCR-B 10 |
| LQP02-MN | Printwheel, England Pica 10 |
| LQP02-MP | Printwheel, England Courier 10 |
| LQP02-MR | Printwheel, England Prestige Elite 12 |
| LQP02-MS | Printwheel, WP Letter Gothic 12 |
| LQP02-MT | Printwheel, WP Gothic 15 |
| LQP02-MV | Printwheel, ASCII-96 Prestige Elite 12 |
| LQP02-MW | Printwheel, WPS Boldface PS |
| LQP02-MX | Printwheel, WPS Title PS |
| LQP02-MY | Printwheel, WPS Thesis PS |
| LQP02-MZ | Printwheel, Nederland Prestige Elite 12 |
| LQP02-NA | Printwheel, WPS Boldface Italic PS |
| LQP02-NB | Printwheel, Nederland Pica 10 |
| LQP02-NC | Printwheel, Dual Courier 10 |
| LQP02-ND | Printwheel, European Courier 10 |
| LQP02-NE | Greek/Math |
| H9850-HE | Heavy-gauge vinyl dust cover, charcoal brown with Digital logo |
| H9850-AT | LQP02 stand |
| H9850-FA | Paper caddy with 4 5.1 cm (2 in) swivel casters for transporting printer paper, 40 cm wide × 29.8 cm deep (15¾ in × 11¾ in) |
| STKIT-AA | Systems Terminal Tool Kit (60 Hz) |
| STKIT-AB | Systems Terminal Tool Kit (50 Hz) |
| Description | |
|---|---|
| UKN Letter Gothic 12 | |
| WP Courier 10 | |
| WP Pica 10 | |
| WP Prestige Elite 12 | |
| Bilingual Courier 10 | |
| Bilingual Prestige Elite | |
| WP Orator 90% 10 | |
| ANSI OCR-B 10 | |
| England Pica 10 | |
| England Courier 10 | |
| England Prestige Elite 12 | |
| WP Letter Gothic 12 | |
| WP Gothic 15 | |
| ASCII 96 Prestige Elite 12 | |
| WPS Boldface 12 | |
| WPS Title PS | |
| WPS Thesis PS | |
| Nederland Prestige Elite 12 | |
| WPS Boldface Italic PS | |
| Nederland Pica 10 | |
| Dual Courier 10 | |
| European Courier 10 | |
| Greek/Math |
A total of eight controls and indicators are found on the front panel of the LQP02 letter-quality printer.

The green POWER light indicates the operating state of the printer. The light is on when the printer is on-line and ready to print or is printing. The light is off when the printer is off-line.
The green DSR light stays on when the DSR line is activated and the printer is under modem control. When not under modem control, the light is not on.
The red PRINTER ERROR light blinks when a mechanical or electrical problem is detected by the printer. During a PRINTER ERROR, an audible signal is sounded, and the printer will stop printing.
The red RIBBON OUT light blinks when the printer runs out of film ribbon. The RIBBON OUT indicator does not indicate the end of a cloth ribbon, or the breaking or jamming of any type of ribbon. When the end of a film ribbon is detected, a buzzer sounds and the printer stops printing.
The red PAPER OUT light blinks, a buzzer sounds, and printing stops when the printer is out of paper, or if the paper is jammed.
The yellow PAUSE light blinks and printing stops when the PAUSE switch is on.
The PAUSE switch is a rocker switch. When the top is pressed, printing stops and the pause light starts blinking. When the bottom is pressed, printing resumes with no loss of characters and the pause light stops blinking.
Activate the PAUSE switch when changing ribbons or daisywheels, or rolling the paper to the top of the form.
When not printing, and the top of the FORM FEED switch is pressed, the paper advances a page.
The LQP02 letter-quality printer has eight printer controls.

This holds the paper against the platen. The two handles permit adjustment of the entire bail from either side of the printer.
The paper thickness lever adjusts spacing between the daisywheel and the platen. For an average thickness, place this lever in the forward position. For thicker sheets, envelopes, and multipart forms, move this lever toward the back of the printer.
This movable edge eases paper insertion at any point along the platen.
This establishes a printer reference line for the top edge of the paper and assists in locating the vertical printing position. Paper should never be pulled against the card guide, but rather the formfeed switch should be pressed or the platen knob turned.
This indicator assists you in positioning paper on the platen and locating the horizontal printing position.
The paper release lever controls pressure applied to the paper by the cradle rollers underneath the platen. Backward movement of this lever holds the paper tightly against the platen. Forward movement releases the paper.
Turning the right knob clockwise or the left platen knob counterclockwise advances the paper through the printer.
When activated, this switch informs the status protocol handler of the printer’s condition. This means that you can signal the host of a printer problem that may cause the loss of text.
The LQP02 Letter-Quality Printer contains two banks of configuration switches, which are set for worldwide system operation without a modem. If you need to change the configuration, the switches required for this operation are located on the back of the LQP02. Note: Before resetting the switches, check that you have turned the power off.
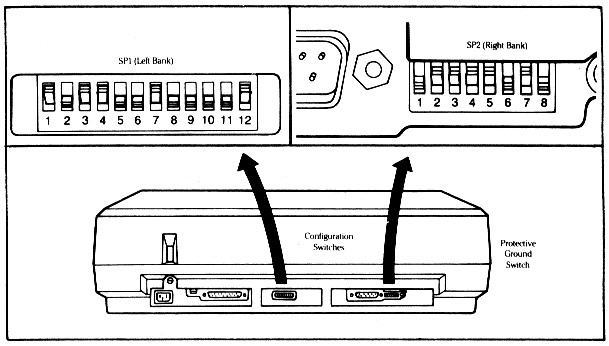
The switch positions can be easily changed by flipping the position up or down. When the switch is down, it is off. When up, the switch is on. A diagram of the switches can be found underneath the front cover of the LQP02.
The left group contains 12 preset switches (SP1-1 through SP1-12). These are factory set at the following:
These switches select the speed at which the printer transmits and receives data from the host processor. The LQP02 is factory set for 4800 baud.
| Baud Rate Bits per Second | SP1-1 | SP1-2 | SP1-3 | SP1-4 |
|---|---|---|---|---|
| 75/600 | Down | Down | Down | Down |
| 75/1,200 | Up | Down | Down | Down |
| 110 | Down | Up | Down | Down |
| 134.5 | Up | Up | Down | Down |
| 150 | Down | Down | Up | Down |
| 200 | Up | Down | Up | Down |
| 300 | Down | Up | Up | Down |
| 600 | Up | Up | Up | Down |
| 1,200 | Down | Down | Down | Up |
| 1,800 | Up | Down | Down | Up |
| 2,000 | Down | Up | Down | Up |
| 2,400 | Up | Up | Down | Up |
| 3,600 | Down | Down | Up | Up |
| 4,800 | Up | Down | Up | Up |
| 7,200 | Down | Up | Up | Up |
| 9,600 | Up | Up | Up | Up |
These two switches select the parity mode.
| Parity Mode | SP1-7 | SP1-8 |
|---|---|---|
| Mark | Down | Down |
| Odd | Down | Up |
| Space | Up | Down |
| Even | Up | Up |
The table below names the remaining left bank switches and explains their function, and the meaning of up and down position settings. Refer to Figure 11-6.
| Switch | Function | Up Position | Down Position |
|---|---|---|---|
| Stop Bits (SP1-5) |
Selects one or two stop bits for data format. | Two stops bits | One stop bit |
| Full/Restricted Modem Control (SP1-6) |
Indicates the presence or absence of a modem. | Full modem control | Restricted modem control |
| RLSD Disconnect Timing (SP1-9) |
Selects the two second (2 s) timer or 60 ms timer for data channel RLSD (received line signal detector) aborts. | 60 milliseconds | 2 s timer |
| Paper Out Enable (SP1-10) |
Enables or disable paper-out sensor. | Disables | Enables |
| Status Inhibit (SP1-11) |
For system testing, inhibits or enables status transmission for polled requests. | Inhibits a status transmission for polled requests until all printer buffers are empty. | Enables |
| Self-test (SP1-12) |
Selects self-test operation. | Disables | Enables formfeed switch to start electronic and mechanical tests of printer operation. |
The right bank contains eight switches (SP2-1 through SP2-8). Factory settings are indicated by †. See Figure 11-6.
| Switch | Name | Function | Up Position | Down Position |
|---|---|---|---|---|
| SP2-1 | Transmitted Data | Allows printer to send data to host via I/O connector pin 2. | Disables | Enables† |
| SP2-2 | Transmitted Backward Channel Data | Allows printer to send data to host via I/O connector pin 14. | Disables† | Enables |
| SP2-3 | Transmitted Backward Channel Signal | Prepares a modem to receive a signal. | Disables† | Enables |
| SP2-4 | Request to Send | Prepares a modem to receive a signal. | Disables† | Enables |
| SP2-5 | Request to Send Off Level | Enables/disables send off function. | Disables† | Enables |
| SP2-6 | Ready for Sending | Allows modem to say if it is ready or not to receive data from the printer. | Disables | Enables† |
| SP2-7 | Backward Channel Ready | Selects backward channel ready line. | Disables† | Enables |
| SP2-8 | Data Signaling Rate Selector | Connects data signaling rate selector line to a modem. | Disables | Enables† |
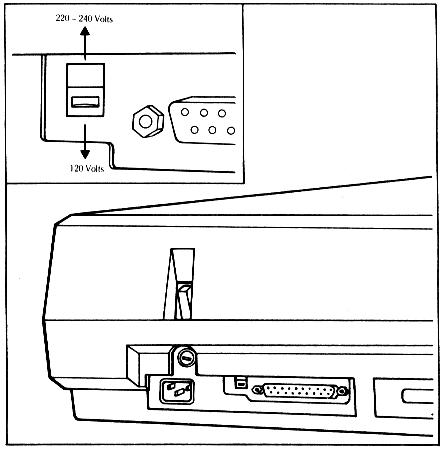
When a modem is installed in your system, the up position of this switch connects the printer frame to the “protective ground” line (I/O connector pin 1). See Figure 11-6.
Normally, this switch is in the up position with or without a modem. But in other countries, such as Germany or the United Kingdom, local safety regulations require that the switch be in the down position, where the printer ground is not connected to the electrical ground.
The LQP02, like Digital’s other receive-only printers, uses escape sequences and features that were standardized by the American National Standards Institute (ANSI). Following the brief description of each escape sequence feature will be the summary of the actual escape sequence required. Detailed information on all LQP02 escape sequences can be found in the LQP02 Printer Programmer’s Reference Manual.
Some frequently used escape sequences are outlined below. Note: In this section, VAI stands for vertical advance increment and one VAI equals 1/48 of an inch. HAI stands for horizontal advance increment, and one HAI is equal to 1/1200 of an inch.
| Name | Function | Escape Sequence |
|---|---|---|
| Printer Initialization | Resets printer to default settings. | ESC c |
| Perform Next Line Forward | Advances paper to next line. | ESC E |
| Enter Right Margin Wrap Mode | Set right margin wrap mode. | ESC [ ? 7 h |
| Exit Right Margin Wrap Mode | Reset right margin wrap mode | ESC [ ? 7 l |
| Enter New Line Mode | Set new line mode. | ESC [ 20 h |
| Exit New Line Mode | Reset new line mode. | ESC [ 20 l |
| Set Forms Size | Pn must be between 1 and 169, inclusive | ESC [ Pn t |
| Set Horizontal Tab at Selective Columns | Pn equals the column number. | ESC [ Pn1 ; . . . ; Pn16 u |
| Clearing Horizontal Tabs | Clears all horizontal tabs. | ESC [ 3 g |
| Set Vertical Tabs at Selective Lines | Pn equals the line numbers. | ESC [ Pn1 ; . . . ; Pn16 v |
| Clear Vertical Tabs | Clears all vertical tabs. | ESC [ 4 g |
| Setting Right and Left Margins | Pn1 must be less than Pn2. | ESC [ Pn1 ; Pn2 s |
| Setting Top and Bottom Margins | Pn1 must be less than Pn2. | ESC [ Pn1 ; Pn2 r |
| Set Underlining | Enable underline mode. | ESC [ 4 m |
| Set Underlining | Disable underline mode. | ESC [ Ps m |
| Set Shadow Printing | Enable shadow printing. | ESC [ ? 2 m |
| Set Shadow Printing | Disable shadow printing. Ps equals 0 or null. | ESC [ Ps m |
| Setting VAI and HAI to Numeric Parameters | Pnv must be between 15 and 960, inclusive. Pnh must be between 6 and 768, inclusive. |
ESC [ Pnv ; Pnh SP G |
You can also set HAI and VAI to selective parameters.
| HAI | Ps | Characters per Inch |
|---|---|---|
| 12 | Null | 10 |
| 12 | 0 | 10 |
| 12 | 1 | 10 |
| 10 | 2 | 12 |
| 10 | 3 | 12 |
| 10 | 4 | 12 |
| 12 | 5 | 10 |
| 12 | 6 | 10 |
| 12 | 7 | 10 |
| 12 | 8 | 10 |
| 8 | 9 | 15 |
| VAI | Ps | Characters per inch |
|---|---|---|
| 8 | Null | 6 |
| 8 | 0 | 6 |
| 8 | 1 | 6 |
| 6 | 2 | 8 |
| 6 | 3 | 8 |
| 24 | 4 | 2 |
| 16 | 5 | 3 |
| 12 | 6 | 4 |
Communications protocols can also be established by using escape sequences.
| Name | Function | Escape Sequence |
|---|---|---|
| Set Status Communication Protocol | Polled report request. | ESC [ 5 n |
| Enable brief unsolicited reports and send an extended report. | ESC [ ? 2 n |
|
| Enable extended unsolicited reports and send an extended report. | ESC [ ? 3 n |
|
| Disable all unsolicited reports. | ESC [ ? 4 n |
|
| Send Brief Status Report | Printer response: Ps equals 0, printer is ready, no malfunctions detected. | ESC [ Ps n |
| Printer response: Ps equals 3, printer is not ready, a malfunction is detected. | ESC [ Ps n |
|
| Send Extended Status Report | Printer Response: Ps1 equals 0, printer is ready, no malfunction is detected. | ESC [ Ps1 n |
| Printer Response: Ps1 equals 3, printer not ready, there is a malfunction detected. | ESC [ Ps1 n |
You should note that Ps2 can be any of the following values:
The LQP02 letter-quality printer does not require preventative maintenance. However, in order to ensure proper operation of your LQP02 printer, keep the following items in mind.
To initiate a self-test procedure:
If your printer is not operating, chances are the problem is minor and you can correct it yourself. Listed below are some of the common problems, their probable cause, and the corrective action you can take. Note: Always turn off the printer before you attempt to correct a problem.
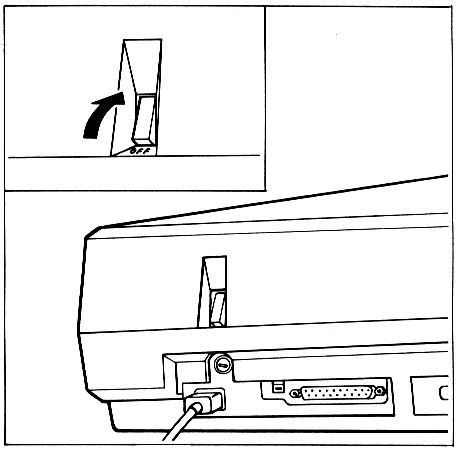
Printer stops or won’t turn on (power light off).
Printing stops or won’t start (power light on).
Printing stops or won’t start (printer error light on).
Power-up failure (power light on, buzzer sounds continuously).
Some characters improperly spaced or positioned.
Characters too close together or too far apart.
Characters not consistently dark.
Characters not sharp or dark enough.
Parts of characters missing.
Top or bottom of characters missing.
Ribbon breaks or jams.
Perforated paper.
The following documents contain more detailed information about the LQP02 letter-quality printer.
Also of interest are:
If you require information not contained in these documents, contact your local Digital representative.
| Print speed | 32 char/s (letter-quality, Shannon text) |
| Print technology | Bidirectional, full-character, impact |
| Print density | Full character, even density |
| Character pitch | Variable pitch, software selectable (10 char/in default) |
| Line spacing | Variable, includes proportional spacing (6 l/in default) |
| Vertical slew speed | 5 in/s |
| Buffer capacity | 256 |
| Buffer control | XON/XOFF |
| Type | Cutsheet or fanfold |
| Dimensions | |
| Cutsheet | 7.6 cm to 34.3 cm (3 to 13.5 in) wide |
| Fanfold | 7.6 cm to 38.1 cm (3 to 15 in) wide |
| Thickness | 0.025 cm (0.011 in) maximum |
| Baud rates | 75, 110, 134.5, 150, 200, 300, 600, 1200, 1800, 2000, 2400, 3600, 4800, 7200, and 9600, full-duplex transmission |
| Data interface | Serial RS232-C EIA standard |
| Parity | 7-bit, odd, even, mark or space |
| LQP02-AA | 120 Vac, 60 Hz |
| LQP02-AD | 240 Vac, 50 Hz |
| Power consumption | 120 W, average RMS |
| Temperature | 10°C to 40°C (50°F to 104°F) |
| Relative humidity | 10% to 90% |
| Width | 63.5 cm (25 in) |
| Depth | 40.6 cm (16 in) |
| Height | 17.8 cm (7 in) |
| Weight | 22 kg (48 lb) |